- Cursive Alphabets
- Cursive K
Cursive K Tutorial and Worksheet (Uppercase + Lowercase)
On this page, you will learn how to write uppercase cursive K and lowercase cursive k step by step. You’ll also get free printable and downloadable cursive K worksheets for tracing and practice.
Download Cursive K Worksheet
Ready to start writing cursive K? First, download the cursive K worksheet and then follow the steps below.

How to Write K in Cursive
The cursive K is a stylish letter with tall, looping lines and elegant curves. The uppercase cursive looks graceful and bold, while the lowercase flows smoothly into other letters. It looks a bit tricky at first, but once you understand its steps, writing k in cursive becomes simple and fun. Let’s learn both forms, uppercase and lowercase K, with easy strokes!
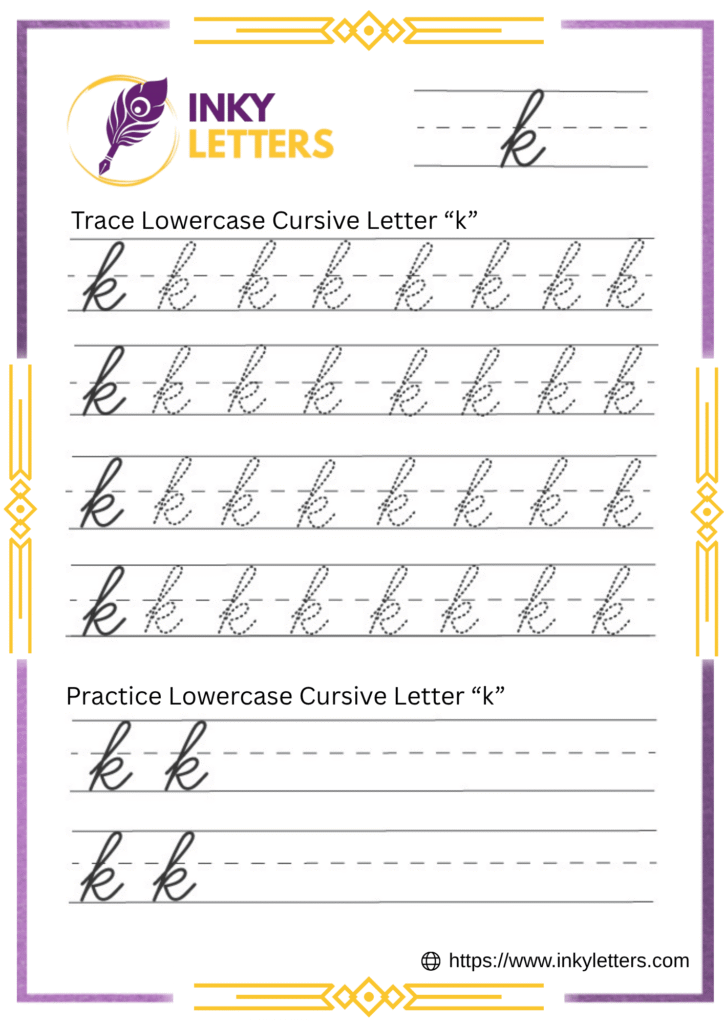
Lowercase Cursive k
The lowercase cursive k begins with a tall, looped upward stroke from the baseline, then comes straight back down. Without lifting your pen, curve up slightly to the middle line to form a small diagonal arm to the right, which then curves down to link to the next letter. Practice is key for keeping the strokes smooth and consistent.
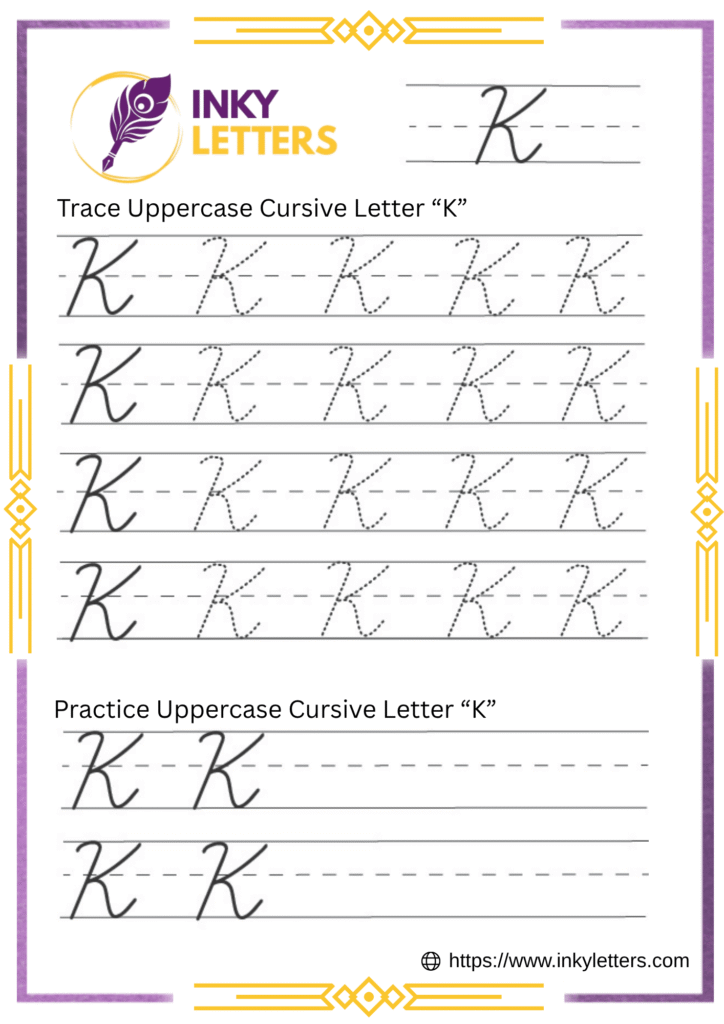
Uppercase Cursive K
The uppercase cursive K is a classy, two-part letter. It begins just below the top line with a small upward loop that curves to the left, followed by a long stroke brought straight down to the baseline. After lifting the pen, you start a new stroke from the middle of the vertical line, curving it out and back to form the upper arm. This is immediately followed by a flowing lower arm that elegantly sweeps out and up, giving the letter its signature balance. Focus on practicing smooth, even curves for a bold and polished appearance.
How to Connect Cursive K to Other Letters
Once you’ve learn to write k in cursive, the next step is learning how to connect it with other letters. These connections are what make your cursive writing look beautiful and consistent.
How to Connect Lowercase Cursive k
The lowercase cursive k ends with a soft curve that points to the right, making it easy to link with the next letter. Its ending tail is short and naturally flows into vowels or rounded letters.
How it connects:
- k + a / o / e: Let the finishing stroke of k roll smoothly into the round part of the next letter.
- k + i / u / y: Keep the curve gentle and low to maintain rhythm.
- k + l / h: Stretch the tail slightly upward before forming the next tall stroke.
Download practice worksheets:
- Joining Letters: ka, ke, ki, ko, kl.
- Cursive Words: kind, king, kite, keep, knob.
How to Connect Uppercase Cursive K
The uppercase cursive K often stands alone, especially in names and titles, but you can connect it if you wish to create a smooth writing flow.
How it connects:
- K + a / o: Begin the next letter close to the ending tail of the K’s lower arm.
- K + e / i: Flow gently from the lower curve into the starting line of the vowel.
- K + l / t: Add a short connector line from the K’s midsection to the next tall stroke.
Download practice worksheets:
- Joining Letters: Ka, Ke, Ki, Kl, Ko.
- Cursive Words: Kevin, Kate, Kelly, King, Kite.
Here’s What Most People Ask Us
Start with a tall loop to the top line, then pull it down. From the middle, make a short diagonal arm that curves inward. Keep it narrow for neat strokes.
Not always. Most people lift the pencil after K, especially in names. You can connect it if the last stroke meets the next letter’s start.
Your middle arm might be too long. Keep it closer to the main line and practice slowly for better control.
It has more parts that meet in the middle. Practice each section separately, then combine them for smoother writing.
Use light pressure, even loops, and a soft tail. Steady tracing and repetition make your K elegant and balanced.