- Cursive Alphabets
- Cursive D
Cursive D Tutorial and Worksheet (Uppercase + Lowercase)
On this page, you will learn how to write uppercase cursive D and lowercase cursive d step by step. You’ll also get free printable and downloadable cursive D worksheets for tracing and practice.
Download Cursive D Worksheet
Ready to start writing cursive D? First, download the cursive D worksheet and then follow the steps below.

How to Write D in Cursive
The cursive D has a tall, elegant loop and a soft curve that gives it a graceful look. The uppercase D looks big and bold with a smooth, round curve, while the lowercase d is smaller with a gentle upward loop. It may look tricky at first, but once you learn the pattern, it becomes easy to write. Let’s see how to make both uppercase and lowercase cursive D.
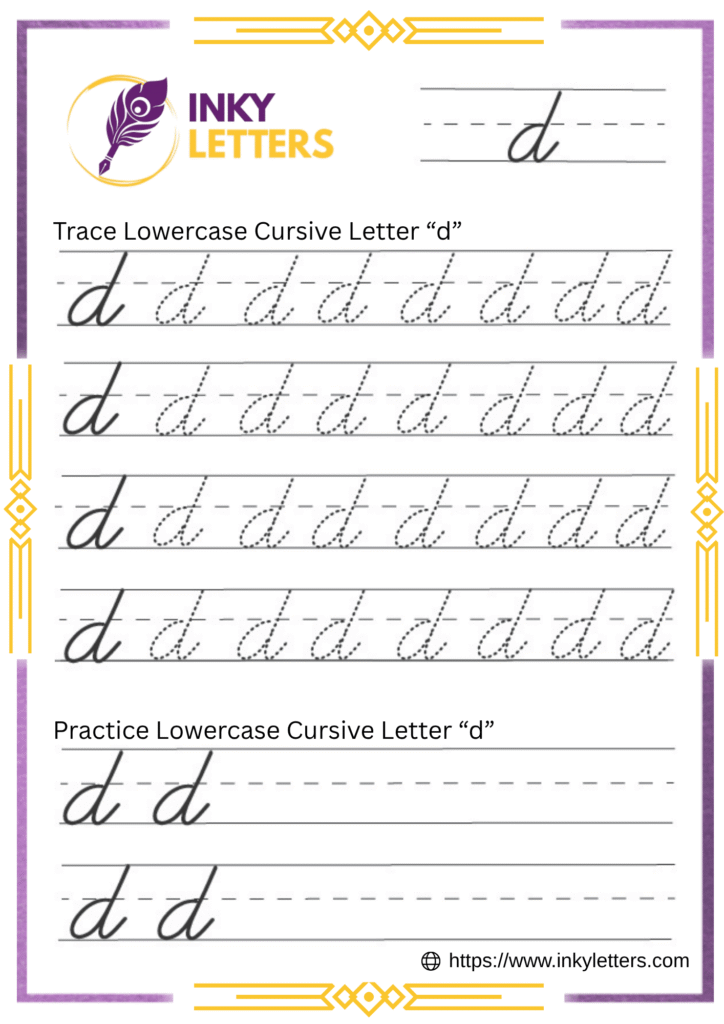
Lowercase Cursive D
Start at the baseline and move your pencil upward in a slight curve to the left. Form a small loop at the top, then circle to create a neat oval shape, just like a cursive “a.” Without lifting your pencil, extend the stroke up to the top line to form a tall stem, and bring it straight back down to the baseline.
Finish with a short exit tail to connect smoothly with the next letter. Keep your loop narrow and your oval round. This balance gives your lowercase cursive d its clean, elegant look
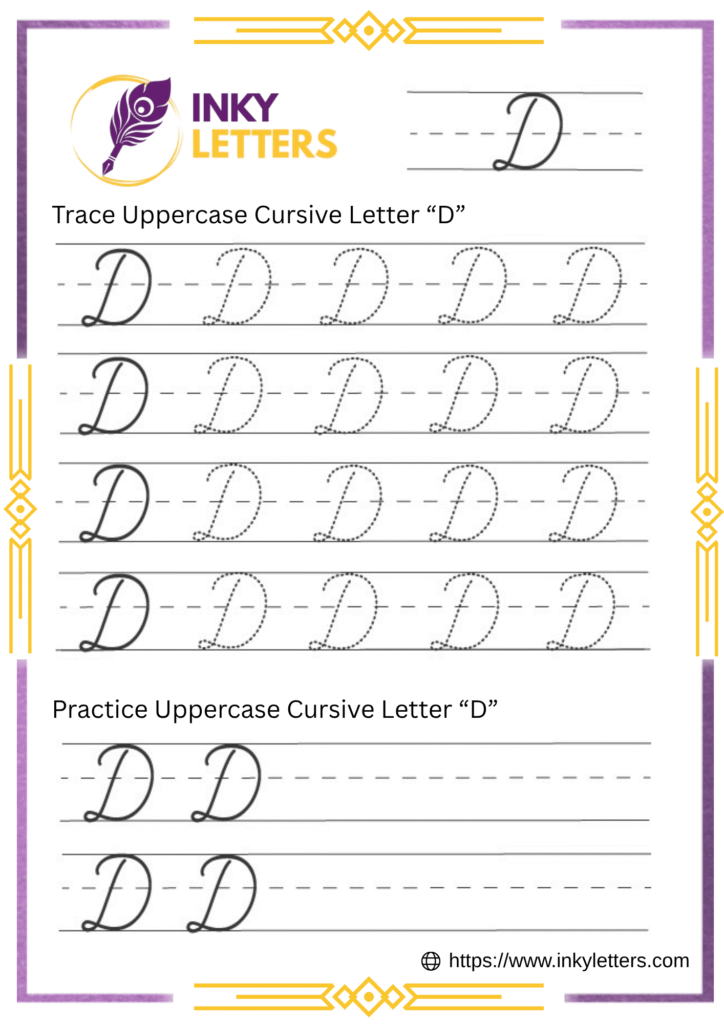
Uppercase Cursive D
Start at the top line and curve slightly upward to the left to form a smooth loop. Then draw a straight downward stroke to the baseline. This creates the tall spine of the letter. Next, move your pencil in a large, rounded curve to the right and back up to the top line, completing the bold, elegant loop of uppercase cursive D.
Uppercase cursive “D” finishes with a small connecting tail on the left side to maintain flow between letters. Keep your strokes light and fluid. Open loops and smooth curves make your cursive D look polished and graceful.
How to Connect Cursive D to Other Letters
After you’ve learned how to write the cursive D on its own, the next step is to connect it with other letters. Connecting letters makes your handwriting flow neatly across the page. Let’s see how both lowercase and uppercase D connect.
How to Connect Lowercase Cursive d
The lowercase d ends with a small curve to the right. This tail helps you move smoothly into the next letter without lifting your pencil.
Here’s how to connect d to different letters:
- d + a / o / e: Let the tail slide directly into the round letter.
- d + l / h / k: Lift the stroke slightly upward before making the tall line.
- d + i / u / n: Keep the curve gentle and move straight into the next stroke.
Download practice worksheets:
- Joining Letters: da, de, do, di, du.
- Cursive Words: dad, dog, dig, day, drum.
Always keep the baseline steady when connecting letters. Uneven connections can make words hard to read.
How to Connect Uppercase Cursive D
The uppercase D is often used at the beginning of names or titles. Usually, it stands alone, but you can connect it to the next letter if you want a smooth, joined style.
Here’s how it connects:
- D + a / o: Start the next letter close to the bottom right curve.
- D + l / t: Add a small stroke from the middle line to begin the next letter.
- D + e / i / y: Flow gently from the right side of D into the loop of the next letter.
Download practice worksheets:
- Joining Letters: Da, De, Do, Di, Dy.
- Cursive Words: David, Daisy, Door, Dream, Dance.
Keep uppercase connections soft. Avoid sharp angles so your writing stays elegant and smooth.
Common Mistakes When Writing Cursive D
Although the cursive D may look simple, beginners often make a few common mistakes. Here’s what to avoid:
- Making the loop too small or too tight.
- Forgetting to keep the straight line vertical.
- Overlapping strokes that make the D look uneven.
- Lifting the pencil too early before completing the loop.
Always complete one full stroke before moving to the next. Use cursive worksheets to correct uneven shapes.
How to Connect Lowercase Cursive d
The lowercase d ends with a small curve to the right. This tail helps you move smoothly into the next letter without lifting your pencil.
Here’s how to connect d to different letters:
- d + a / o / e: Let the tail slide directly into the round letter.
- d + l / h / k: Lift the stroke slightly upward before making the tall line.
- d + i / u / n: Keep the curve gentle and move straight into the next stroke.
Download practice worksheets:
- Joining Letters: da, de, do, di, du.
- Cursive Words: dad, dog, dig, day, drum.
Always keep the baseline steady when connecting letters. Uneven connections can make words hard to read.
How to Connect Uppercase Cursive D
The uppercase D is often used at the beginning of names or titles. Usually, it stands alone, but you can connect it to the next letter if you want a smooth, joined style.
Here’s how it connects:
- D + a / o: Start the next letter close to the bottom right curve.
- D + l / t: Add a small stroke from the middle line to begin the next letter.
- D + e / i / y: Flow gently from the right side of D into the loop of the next letter.
Download practice worksheets:
- Joining Letters: Da, De, Do, Di, Dy.
- Cursive Words: David, Daisy, Door, Dream, Dance.
Keep uppercase connections soft. Avoid sharp angles so your writing stays elegant and smooth.
Here’s What Most People Ask Us
Start with tracing! Break the letter into simple steps one stroke at a time. Let children trace small d ‘ and big ‘D’ using cursive worksheets until they get the shapes right.
Always begin with lowercase d because it’s used more often in daily writing. Once you’re comfortable, move to uppercase D for names and titles.
Yes! Left-handed writers can write cursive D. They just need tilt paper slightly to the right and keep your wrist below the writing line to avoid smudges.
Good combinations include da, de, do, di, du. You can practice words like dad, dog, day, door, and drum.
Inkyletters offers free cursive D tracing worksheets. You can download printable cursive D worksheets from the top of this page.